AI
Welcome to Renderforest’s video maker, our new app for iPhone users. The app has been in development for the past year, during which we aimed to create an app that would include all the functionality of the web version of our online video maker and animation maker while making it even more straightforward and intuitive.
With the tools now available in the app, businesses and individuals can create the broadcast-quality videos they need on the go effortlessly.
To assist you with getting started, we’ve written a short, but comprehensive guide that will introduce you to the main features of “Renderforest – Video Maker,” so that you can make the best of it. Let’s dive in!
When you open the app for the first time, you’ll be greeted with a warm message and a 3-step tutorial on how to use the app. Click “Next” to watch it, or skip the tutorial to proceed to the app right away.
After the tutorial, the app will redirect you to our video templates library. There are four navigation options in the menu panel below, which we will discuss in detail later in the article.

To access the app’s full functionality and create videos, we recommend that you start with signing in to your account. For this, select the “More” section on the bottom right. If you have an existing account, type in your email and password, and hit “Continue.” Alternatively, you can sign in with Apple, Facebook, and Google.
In case you don’t have an account yet, click the “Sign Up” button on the bottom. You’ll be redirected to the sign-up page, where you can register using an email, through your Apple ID, Facebook, or Google accounts.

After you sign up, it’s the right time to start exploring the app.
To start the video creation process, browse through the wide selection of available video templates in the “Templates” section on the bottom-left of the page and pick the one that best fits your project’s aesthetics and aim. Check out the main video categories including animation templates, intros, slideshows, presentations, and music visualizations. Tap on a template and hold it for a quick preview. Here you can click on “Create now” to start a new project, add the template to your favorites, or remove it, and share the template.

If you want to find a specific type of video, you can use the filters or the search bar at the top.

If you still can’t decide which template to choose, click the “+” button below and use our advanced filtering options. Here, you can select what type of video you want to create and the category.

Then, choose one of the suggested templates. You’ll be presented with a selection of templates matching your preferences. Watch a short preview of each template to see how they look.
Once you’ve found the perfect template for your project, hit “Use This Template” to start the creation process. In this tutorial, we’ll go with the “Trendy Explainer Toolkit” and create an explainer video.

When you click on “Create now”, you’ll be prompted to select one of the two options of making a video: using a ready-made story or manually adding scenes.
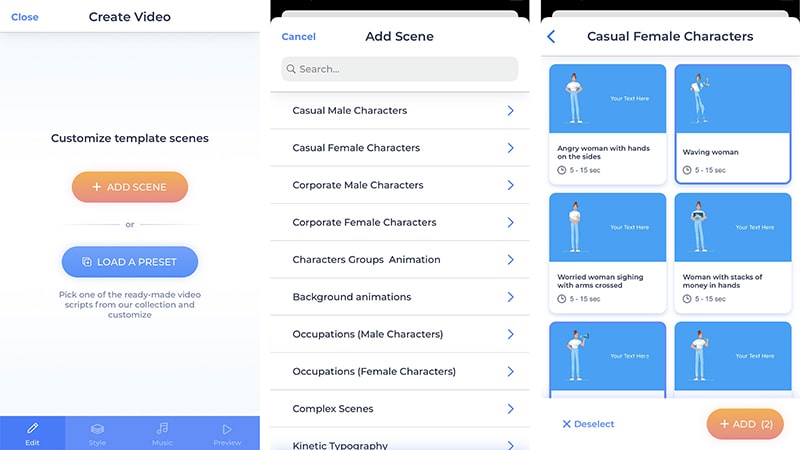
The “Add a Scene” section is where you start crafting your video from scratch by manually browsing and selecting the scenes that represent your idea or product accurately.
For simpler navigation, the scenes are separated by categories. Go through each category, and pick the scenes you want to add to your video. Insert scenes one by one, or select several and add them at once. You’ll be able to delete scenes or add new ones later if there is a need.
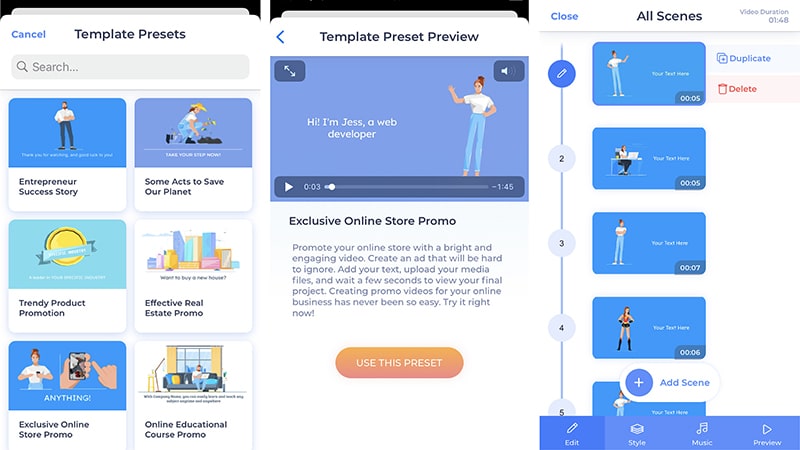
In the “Load a Preset” section, you can find an extensive catalog of pre-made video stories for different business and personal needs that aim to streamline and simplify the creation of animation. Go through the preset list, preview the stories, and if there is a preset that fits your needs, start editing it by clicking on “Use This Preset.”
In the next step, you can go through the scenes and make changes if there is a need. Duplicate the scenes, reorder, delete them, or add new ones, to customize the storyline. To edit each scene separately, select the scene and click on the edit button on the left.
In the scene editor, you have a wide selection of tools at your disposal that you can use to edit and personalize each scene. Type in your message in the text field, adjust the font size to make the text smaller or bigger.
Based on the length of your text, our editor suggests an optimal scene duration; however, you can change the duration from the pencil menu on the top-left.
After the edits, you can preview how your scene looks by using the snapshot feature and make additional changes if needed. In case you need to replace the scene and find a more suitable one, you can do so right from the scene editor, by selecting the “Replace Scene” option.

If you want to add your own images to the video, you can do so by selecting scenes with image holders. Depending on the number of photos you want the scene to contain, you can choose a holder with single or multiple images. Click “Replace” on the bottom of the screen to add the image.
You can add images to your video in 5 options: use a camera to take a photo, add a photo from your camera roll, select from your documents, add an image URL, or select an image from your media library.
Adjust the size of the photo by filling or fitting it in the holder for a better look. Besides, there are some editing options you can use to add color to your image or select filters.

To add your own footage to the animation, select scenes with video holders. You can add the video in four ways: using the camera, adding an existing video from the camera roll, selecting a video from your documents, inserting a video URL, or selecting a video from your media library.

Once you’ve added your message and visuals to the scenes, the next step is to edit the style, transition, and fonts of your video to set its overall. Some templates also have a “Color” section to customize the colors and match them with your brand style. You can select from the existing color palettes, or pick custom colors for different components of your video.

The “Music” section is where you can add a catchy background tune to your video and a voiceover. Select from more than 100 tunes available on the app, or upload your music from your device. If you want to add a voiceover, choose one of the available options. Record a voice-over with your device right in the editor, use our text-to-speech feature to generate one, select from Music, or choose from your documents.

When you select the text-to-speech feature, you can customize your voiceover by adding the text, selecting the language, and choosing between female and male voices. You can also change the speed of your voiceover. When you adjust all the settings, click on “Generate” and “Done”. Write down the title of your voiceover and save it.

After you’re done with the editing process, go to the “Preview” section to preview and export your video. Select “Free Preview” to watch the video and make sure you’re satisfied with the result. If there are any changes you want to make, you can go back to the editor. You can turn on your push notifications to get notified once your video is ready.

Once the video is finalized, you can export it in your preferred resolution from the “Export High Quality” section. The video will be saved in your account, and you can access it for editing or downloading anytime from “My videos.” You can also access the video settings from a three-dot menu near the video title.

The “More” section on the bottom right is where you can access and edit your account settings, see your media library, and get support if there is a need.
Explore “My Profile” page to get more information about your account, storage, subscription, video and project settings, personal data, and more.

From “Help and Support,” you can find answers to your questions. Type the question you may have or scroll down to the list of frequently asked questions.
In case you need further assistance, you can contact our 24/7 support team directly from the “Send Feedback” section.

Conclusion
The launch of the “Renderforest – Video Maker” iOS app is a big step towards simplifying video creation and making it more accessible. In the article above, we’ve tried to introduce you to our new app’s main functionalities to make the creation process as smooth as possible.
Ready to explore the app? Hurry up and give it a try today! Also available on Android.
Share this
Article by: Renderforest Staff
Dive into our Forestblog of exclusive interviews, handy tutorials and interesting articles published every week!
Read all posts by Renderforest Staff