Video Editing
Have you ever worried about being taken as an amateur because of producing poor-quality voice-overs?
Recording in a professional studio will cost much. Meanwhile, the process sounds even more challenging when you try to deal with it in a home setup.
Even though many people admit that producing quality voice-overs requires a lot of effort, it’s totally worth it. People learn best and are attracted the most to the content which is presented through a variety of styles, targeting different senses. Voice-overs help you to better connect with your audience.
If you’ve also faced difficulties in the process just like many others, you are in the right place. In this article, you will learn how to steer clear of the biggest voice-over mistakes and produce the most effective voice-overs for your video.
Some of you might think that the audio portion is less important in videos than the visual component. But, in fact, the audio component is more than just necessary to develop a strategic video content plan.
Many viewers admit that bad audio quality can stop them from watching a video. The study conducted by TechSmith proves that more than 25% of video viewers watch a video till the end because of the good-quality audio.
Not yet convinced of how big is the role of a voice-over in a video? Then check this out as well.

Studies show that visuals tagged along with quality voice-overs make your message more influential.
“Failure is instructive,” people say. But even if we all agree it’s instructive, do you still want to fail?
To avoid failure, let’s better learn what are the most common mistakes in recording a voice-over.
Let’s have a look at the 7 most critical voice-over mistakes.
First of all, you should avoid bad production quality. According to the research conducted by the Statistics Portal, 33% of respondents admit that they seize watching a video right away if it has poor quality or resolution. It implies non-professionalism.
A desktop computer’s internal microphone, for example, is low-quality equipment for a successful voice-over. This way you’ll pick up a lot of outside voices.
You must have seen a recording studio with all of its fancy equipment, a separate room with special sound-absorbing walls, and an expensive professional microphone setup along with the computer workstation.

“But what if I am not ready to spend that much money on a microphone but I still need to record a professional voice-over? Can I record a high-quality voice-over without all this fancy stuff?”
Don’t panic. There is an answer to this. You don’t have to purchase all of that to achieve good results.
First of all, find a space that is free of distracting factors and noises. Avoid recording near the window, where the sounds of traffic will show up in the recording.
Find a good microphone. It doesn’t have to be that fancy.
You can produce a high-quality voice-over with the simple ones as well. A low-cost external microphone will surely do better than a laptop built-in microphone.
You can buy a cheap lavalier mic or even an ordinary Skype-type headset. A good microphone will cost you between $60-$100. But if you are not worried about your budget, then you are welcome to check out the most popular types of microphones for home studios in 2020.
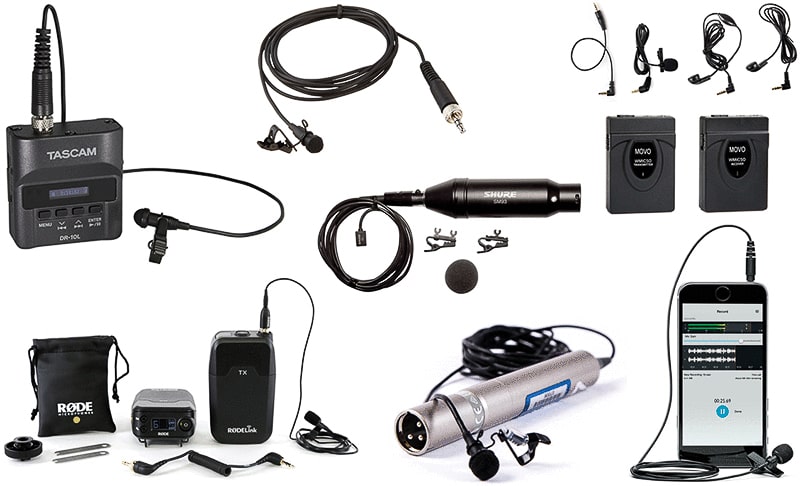
Remember to adjust the microphone properly. For the sound not to get lost in a large room, you should place the microphone only 6-8 inches away from the speaker.
A pop filter is what you’ll need next. Pop filters are recommended because they minimize sounds of hard consonants like “p” and “b.” You can either purchase it or make it yourself, following this tutorial.
With the next step, choose a free audio editing software to adjust certain frequencies of sounds and the volume.
The Top 3 Free Editors:
With the final step, do a little bit of editing.

Equalization, normalization, compression, and limiting are different functions included in the editing process.
This will help you to even out the differences in volume and amplitude within the recording.
Don’t freak out. It’s not as hard as it might seem right now. The editors listed above will guide the process.
All you will need to do is to get a grasp of how they work and everything else will go smoothly.
In case you are not ready to invest in a microphone, you can always use your smartphone. However, there are several nuances to pay attention to when recording audio on a smartphone, such as an echo in the room. We talk about recording audio on smartphones in detail in our article.
Choosing the wrong tone can sound annoying and can easily draw the audience away.
Let’s observe some examples. Would you trust a happy and animated voice, discussing a medical process? Or do you think a high pitched and cheerful voice will work perfectly for serious topics? How do you think a monotone voice can work for e-learning audience? It will put them to sleep instead of encouraging their attention, won’t it?
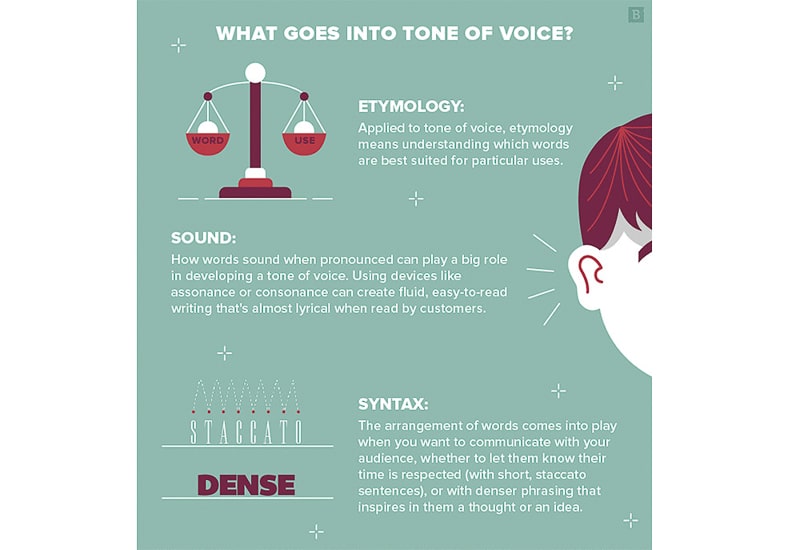
So all of these are examples of wrong tone and topic pairs that are certainly distracting. Tone variations can influence desirability and can imply either friendliness, trustworthiness or else.
First, determine the style of your voice-over. Is it for an explainer video, or an animated cartoon, or what?
Decide which combination of tone dimensions works best for your project (f.e. e-learning, channel video ad). The tone of voice is categorized into 4 dimensions.
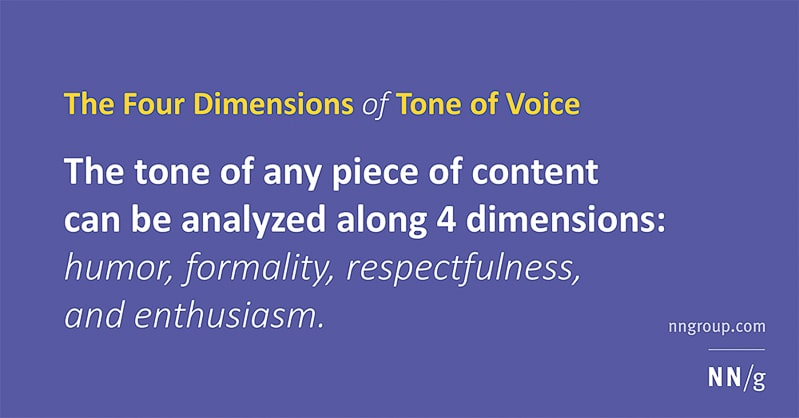
Check out 4 pairs of tone-of-voice samples:
These pairs differ depending on the type of video that you are making.
For example, Dove’s voice-over actor certainly has an empowering and uplifting tone of voice.

Decide how your voice-over is going to sound.

The voice-over should sound authoritative and should imply credibility. If you check out any of Will Lyman and Frontline recordings, you will see that in all of them his authoritative tone makes the audience feel the importance of the subject that he is discussing.
Imagine the impact of such an authoritative voice in a video ad, for example.
So try to be convincing and credible in whatever you claim.
When scripting your voice-over, keep in mind that writing for a blog post greatly differs from writing a script. Quite often, a text that looks and reads well on the paper doesn’t sound the same way in the voice-over. It’s because it was written to be read, not heard.
Try to make your writing conversational. Use “I,” “You,” “We” to appear more friendly and connect you with the audience. If your project is industry-specific, try to reduce the use of industry jargon if there is any.
Once you finish your script, effective practice is to do a table read – sit with your friends, colleagues, or alone and read the script aloud. Does it sound conversational and effortless? If not, you may want to edit it.
Imagine that you are watching a video, and, meanwhile, the written text says one thing, the voice-over actor tells you a completely different thing. Sounds confusing, doesn’t it?
As far as a voice-over actor’s voice is required to match scenes on-screen, it is vital to fit into the given time frame.
Therefore, the rhythm and pace of script reading are as important as the tone.
Write a timeline, including the scripts and the descriptions of scenes in separate columns. Here is an example of such a timeline.

Have you ever heard someone contradicting themselves in their speech?
You must have felt uncertain and confused, haven’t you?
There is nothing worse than an inconsistent message. So it is super important to stick with the message content in the voice-over.
Take the time to write it out in the script because that will help you to make sure you cover everything you intend. It will prevent you from contradicting yourself, repeating yourself, and running off the topic as well.
The best script is the one that is well-reviewed and includes word-for-word everything you intend to say.
Have you ever talked to someone who would tell a very exciting story in such a rush that at the end of the story you would end up not remembering anything from what they were talking about? Or vice versa. Have you met someone who talks about the same thing with the same tone, so monotonically and slowly that you almost fall asleep?
That’s what the wrong choice of pacing is all about. If it’s too fast nobody gets anything, if it’s too slow they may get bored.
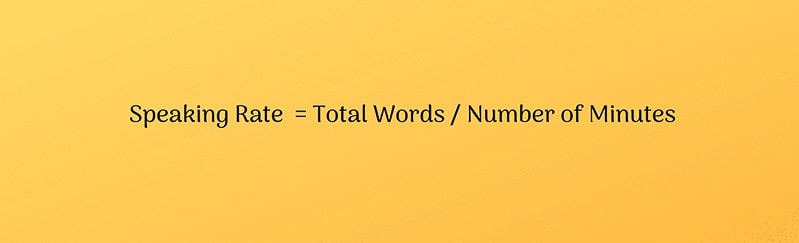
What’s the Golden Mean? How to Get a Natural Pace?
Find a perfect speech rate for your video by counting your words over the minutes of your video.
Take time to understand the topic and the script well. Because it is easy to track a voice-over script reader who is just reading the script without understanding the topic. This way it doesn’t sound natural.
Learn to pause once in a while to give the viewer time to grasp the info. This will come naturally as you practice several times.

Using a metronome to rehearse will help you to gain control over pacing automatically during the recording. Read it aloud several times before recording and track the words that are difficult to understand.
When a high-quality voice-over is recorded but you don’t save it in the right format, then you may lose it.
Audio file extensions and conversion from audio engineering to a proper file format can be confusing for non-professionals.
So choose the right format not to be required to deal with the conversion process later on.
Not sure which format to use?
The 4 most popular formats:
Any of these mistakes in the process of voice-over production can cause trouble both during and after the recording. Avoiding these mistakes in voice-overs lets you craft better video content, thus attracting more views to your videos.
Therefore, be mindful to properly prepare for the process before you hit the record button. Once you’ve recorded your voice-over, consider also to edit and finalize it. Convey your video with an air of weight, validity, and professionalism!
Good luck with recording your voice-over!
Did you know that with Renderforest you can record your voice-over and attach it to your video scenes instantly? Make your videos and edit them in a couple of minutes. Pretty cool, isn’t it?
If you haven’t tried it yet, go ahead!
Share this
Article by: Renderforest Staff
Dive into our Forestblog of exclusive interviews, handy tutorials and interesting articles published every week!
Read all posts by Renderforest Staff