Video Editing
You have probably noticed that many videos online have captions. Adding captions to videos provides lots of benefits, including wider accessibility, a better comprehension of the material, and improved rankings on search engines. But, how to add captions to videos without spending hours on it every time? Let’s find out!
In this article, we will explain how to add captions to YouTube, Instagram, and Facebook videos, as well as create open captions for other social media platforms. If you’re wondering why you should use video captions at all, check out the section where we discuss their many benefits.

Captions are time-indexed chunks of text that appear on a video and provide the typed version of the speech. If a transcript is the plain text version of the audio, captions are small parts of that transcript, each synchronized with a specific portion of a video.
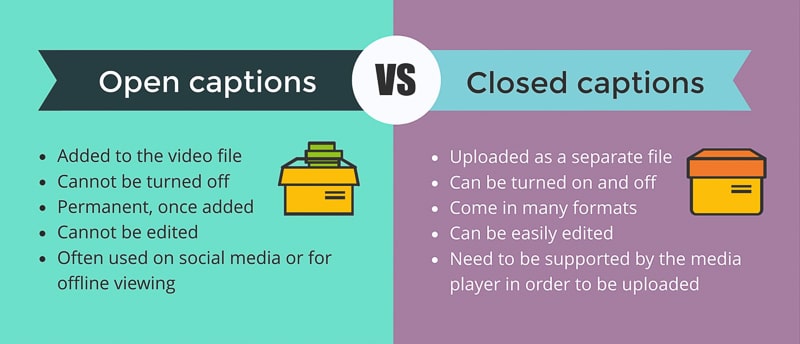
There are two video caption types: open and closed. Open captions are permanently “burned” into the video file itself and cannot be turned off. Closed captions (CC) are uploaded as a separate caption file (usually .srt) and can be turned on and off by the viewers.
Some social media platforms, like YouTube and Facebook, accept closed caption files. Others, like Instagram, Twitter, and TikTok, do not have that option. To upload a captioned video there, you need to add permanent captions to the video itself. Here, we will discuss both methods of captioning videos.
Adding captions or subtitles to your YouTube videos is a must for effectively promoting your channel. The good news is, YouTube has a very helpful feature when it comes to video captions — an automatic caption generator that can add text to your video for you.
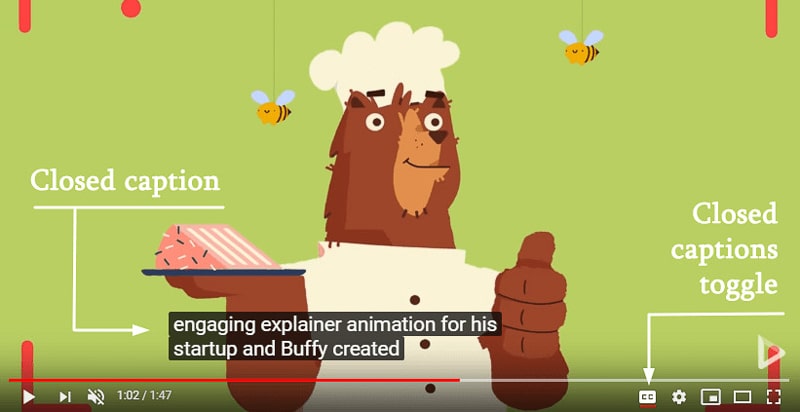
If a YouTube video has captions, you can switch them on by clicking on the closed captions toggle — the “CC” button. The platform allows you to add subtitles in several languages to a single video so that viewers can choose the language they need.
Another cool feature of YouTube captions is the option to download them once they are created. This means you can auto-generate your captions on YouTube with the video subtitle adder tool, and then download and upload your caption file to other platforms that accept closed captions. We’ll explain how to do this later in the article.
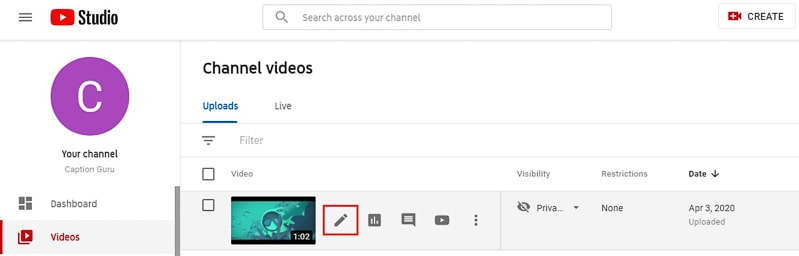
To add subtitles to video on YouTube, log into your account, click on your channel icon and go to “YouTube Studio” from the dropdown menu. If you have already uploaded your video to YouTube, go to the “Videos” section from the left-hand panel and find the video you want to add caption files to. Hover your mouse over the video and click on the pencil icon that says “Details.”
As you find yourself in the editor, scroll down the left-side panel and go to “Subtitles.” First, choose the language you want your captions to be in and click “Confirm.” To check out the auto-generated captions in the chosen language, open your video in a new tab.
Click on the closed captions toggle (CC) and see if you’re satisfied with the result. If you are, then that’s it — your video captions are ready. If not, let’s find out how to edit the captions or create them from scratch.

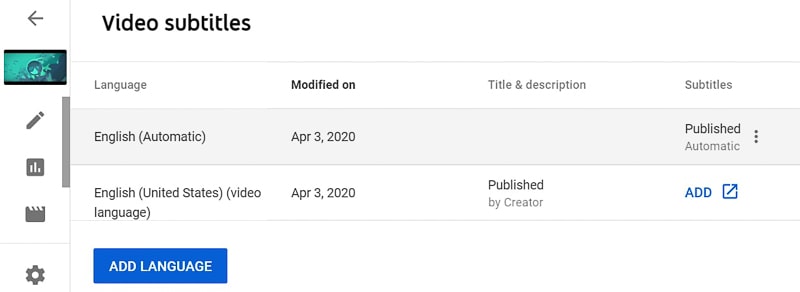
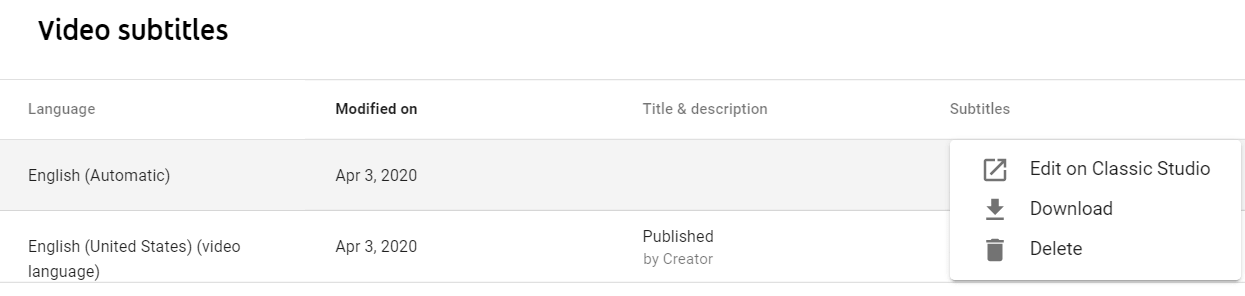
First, go back to the “Subtitles” section in the editor. Here, you’ll find the two options, as shown in the screenshot. To alter the auto-generated captions, click on the three-dot menu of the option that says “[your chosen language] (Automatic)” and click “Edit.” In our case, it’s the “English (Automatic)” option at the top.
To create captions for your YouTube video manually, click on the “Add” button near the language of your choice. If you’d like to add captions in more languages, you can do so from here as well.
YouTube offers three methods for manually captioning your video:
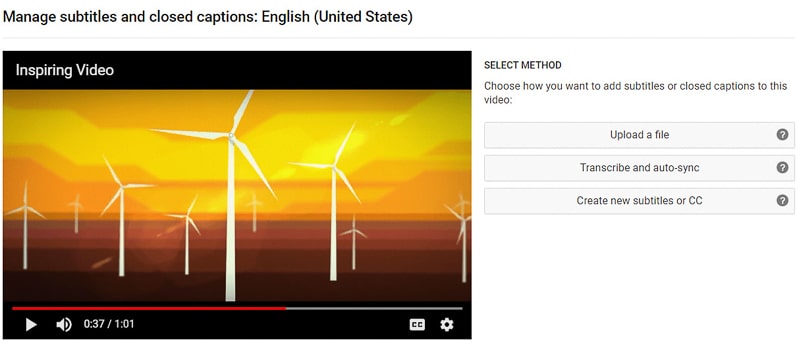
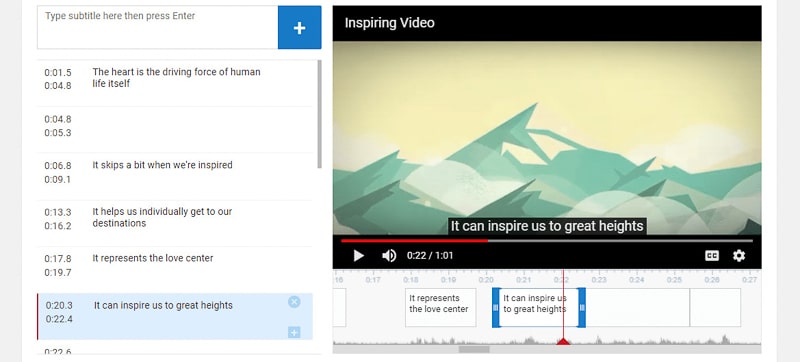
If you choose the third method, you’ll be taken to the same captions editor, as when altering the auto-generated captions. Only in this case, it will be completely blank. Start by playing your video, and type or edit your captions on the left side.
You can manually tweak the time span of each caption by selecting it from the timeline and adjusting the blue edges of the caption box. Once you’ve filled in all the captions and are satisfied with the outcome, click “Save changes.”
That’s all, your Youtube video captions are published. To download and use them on other platforms, go back to the “Subtitles” section, click on the three-dot menu of the relevant subtitles file and choose “Download.” Your captions will be downloaded as a .sbv file.
You can further adjust how your subtitles or captions appear on the screen. To explore the available options open your video in a new tab, click on the settings icon at the bottom, go to “Subtitles/CC” and “Options.” Here, you can change the font, size, and color of your captions, edit the background or window color and opacity.

This whole process of captioning videos might appear long or tiring, but in reality, it’s fairly simple and quick after you’ve done it once. Of course, longer videos will take more time to caption. In this case, it’s better to generate a transcript file with the help of automatic transcription tools. Make sure to proofread it once and upload it to YouTube or other platforms.
Recommended Reading
Like YouTube, Facebook can also automatically generate closed captions for your video online. However, this feature is only available for business pages, not regular profiles.
To use this tool go to your Facebook page and click on “Creator Studio” on the top panel.

Once there, click on “Upload Video” from the “Home” section, and choose the option you need. For this tutorial, we will upload a single video.

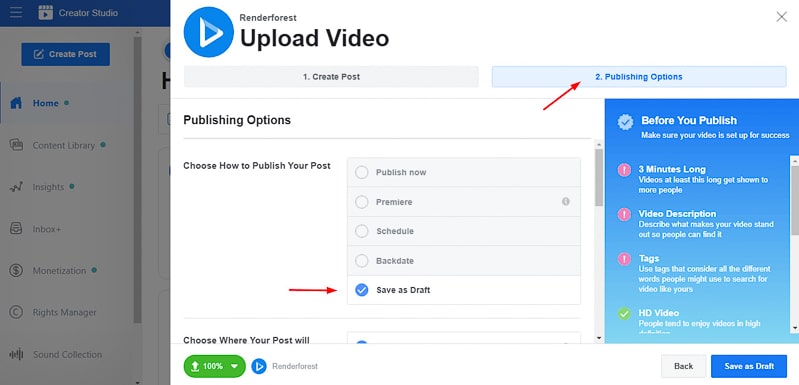
For now, save your video file as a draft by going to “Publishing Options” and choosing “Save as Draft.” Then, click on the blue button on the bottom-right corner of the screen to save the video.
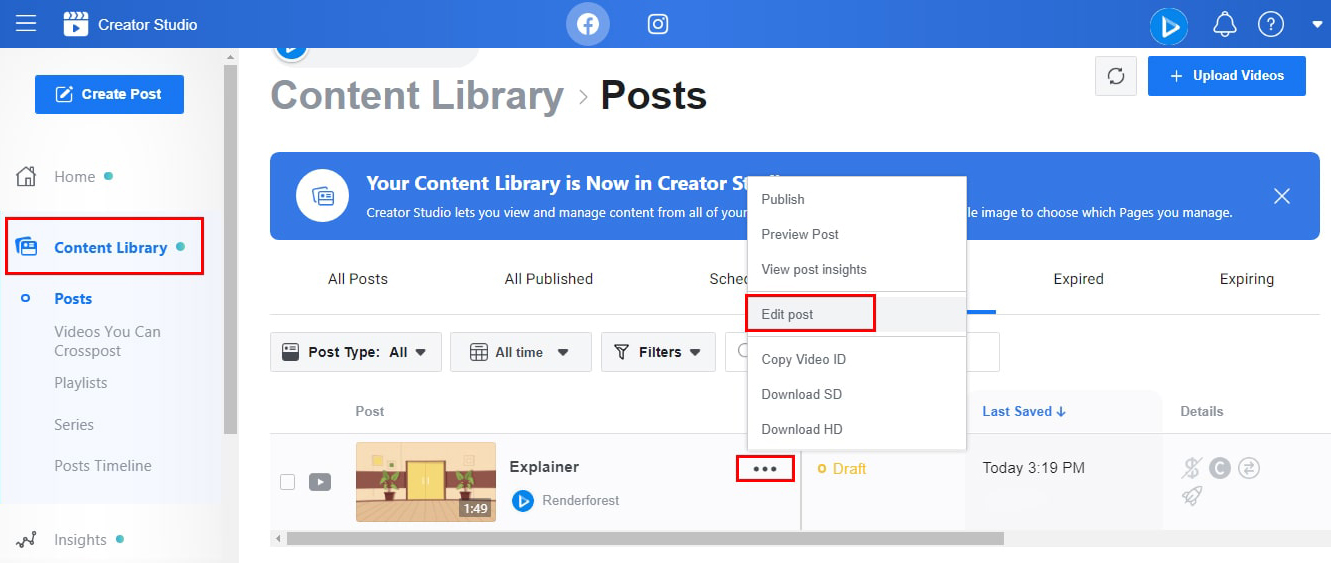
Once the video file is uploaded, go to “Content Library” from the left-hand panel and then, to the “Draft” section. Your video should be here if it’s already uploaded. Click on the three-dot menu (…) right next to your video and choose “Edit post.”
A pop-up window should appear on the screen. Pull down the right-hand slider until you see the “Subtitles & Captions (CC)” section. Click on it. As you can see, there are three options for captioning your Facebook video: auto-generate, write, or upload .srt file.
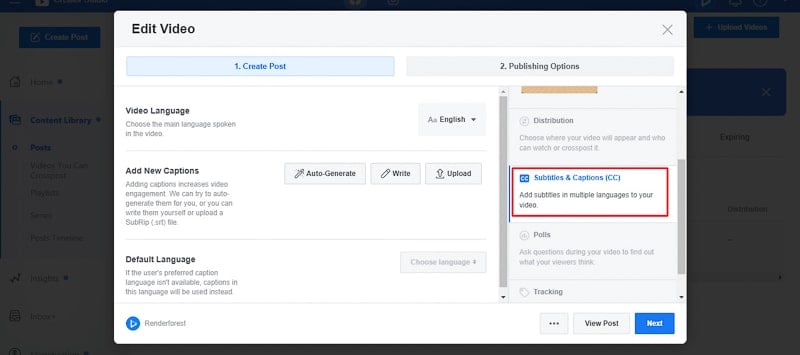
If you already have a .srt file with your captions, upload it here. If not, choose the language of your video and click “Auto-Generate.” You can manually add captions to your Facebook video if you want to, but it’s easier to correct mistaken words than type the entire transcript from scratch.

Once the captions have been generated, click on the pencil icon to edit them or to check if everything is spelled out correctly. As you can see, each caption is in a separate time-coded box. Above each caption is the time when it appears and disappears from the screen.

To correct a misspelling, simply click on the relevant box and edit the transcript as necessary. Pay attention to proper nouns, as they’re the easiest to get wrong. Once you’re done, click “Save,” and then “Next” to go to “Publishing Options.”
Even if you have other edits to make, it’s better to save the project first, so as not to lose the progress. To do so, check the option you need and click on the blue button.
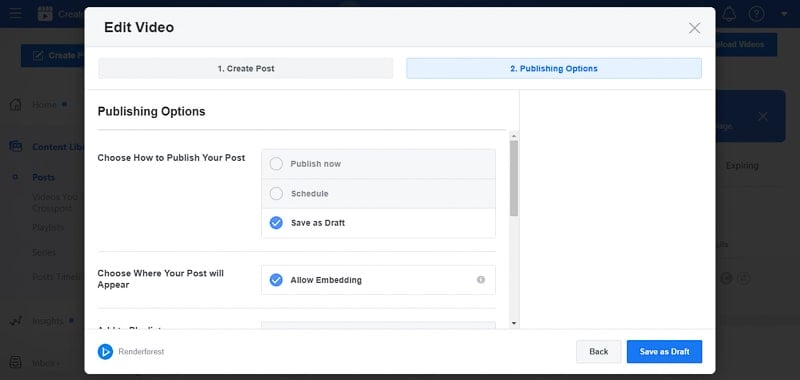
If your video post is ready and you want to publish it on Facebook right away, choose “Publish now.” To schedule it for a later date and time, click “Schedule.” In case there are still edits to be made, save it as a draft.
You can further tweak your caption settings by clicking on the gearwheel icon at the bottom of your video and choosing “More Video Settings.”
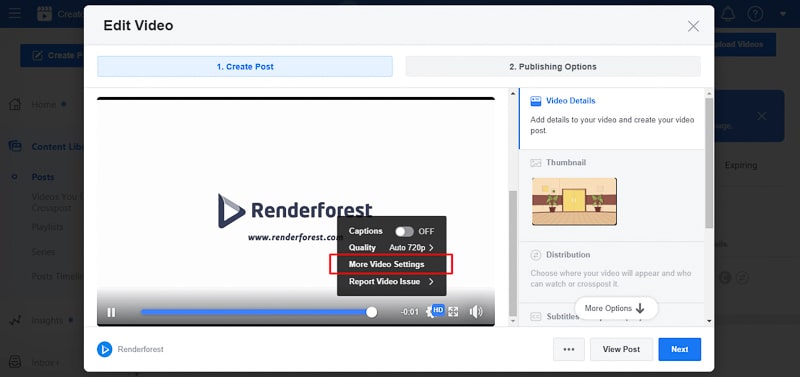
If you want your captions to appear on the screen by default, you can do so from here. Keep in mind that whatever option you choose, it’s going to apply to all of your videos.

You can also customize the way captions are displayed on the screen: choose a different color for the background and adjust its opacity, edit the size or color of the transcript, or leave everything as it is.
That’s it! You’ve successfully added captions to your Facebook video. Now, you can go ahead and enjoy your captioned video post.
Unlike YouTube and Facebook, Instagram does not have closed captions as an option. The only way to go about it is to add permanent open captions to the video itself. The same goes for many other social media platforms, like Twitter, Snapchat, and TikTok.
Hence, this tutorial is suitable not just for Instagram videos but any other platform that doesn’t support captions.
Clips is a native iOS application that generates captions in real-time, as you record a video with the app. It’s a quite efficient way to caption your Instagram videos, as the captions are auto-generated. Plus, you can edit them later on to correct any mistakes.
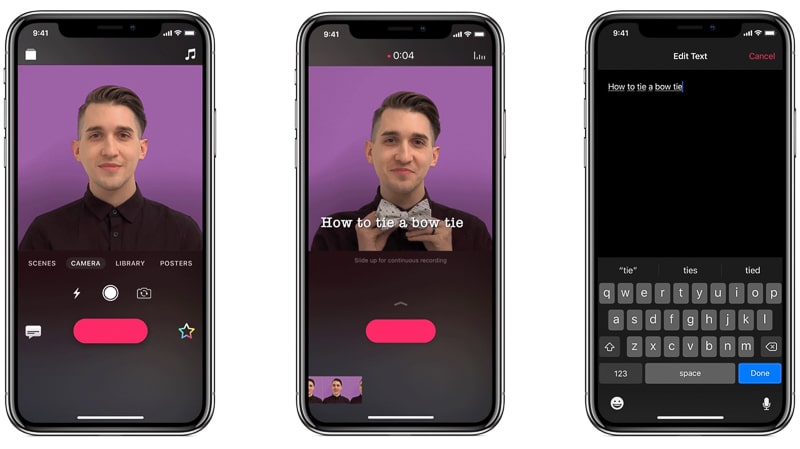
To add captions with the help of this app simply hold the pink button and start recording your video. Check that dictation is enabled on your device. If it’s not, go to Settings > General > Keyboard, and turn “Enable Dictation” on.
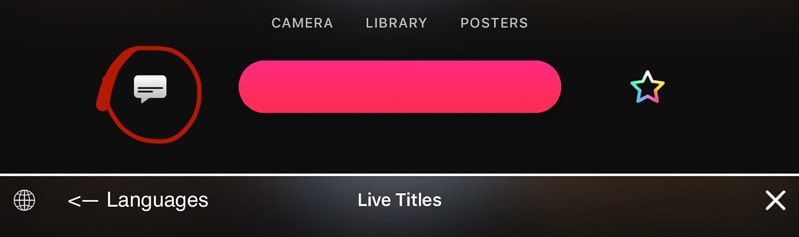
Return to Clips and start recording your speech. Then, tap on your recording and go to “Live Titles” to check the caption for possible mistakes.

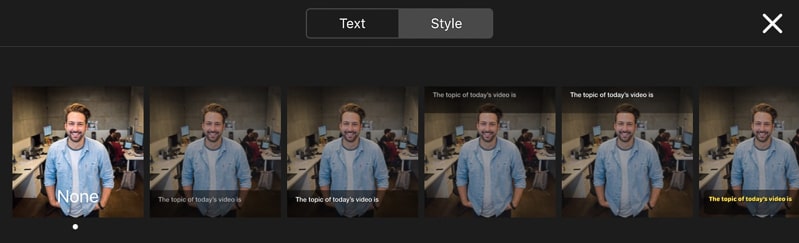
Edit the transcript if necessary and tap “Done.” In the “Style” section, you can pick where and how the titles appear on the screen.
To record titles in a different language, tap on the speech bubble from the recording screen and then the globe icon on the left. A list of available languages will appear. Choose the one you need.
Another cool feature of this app is that it allows you to add images from your photo library and record a voice-over to accompany them. You can then mute the audio if you’d like, and leave only the auto-generated captions to go with the slideshow. Add a music track to the project and you’ve got the perfect video post for social media.
The downside of the app is that you can’t add captions to a video that’s already been recorded or one you’re going to record on another device. And it’s only available to iOS users. If all this sounds like a dealbreaker, let’s move on to our next app.
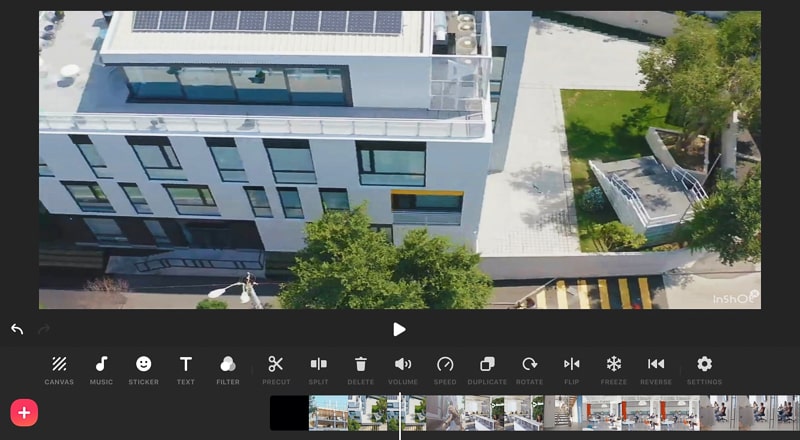
InShot is a free video editing app available both on the App Store and Google Play. The captions created with InShot are quite customizable. You can choose their font, color, size, placement, and even add shadow to separate them from the background.
The only shortcoming is that the captions are not auto-generated. You’ll have to type them yourself. Also, the app leaves a small non-intrusive watermark on your videos, which you can permanently remove for $3.49 or once for free.
To begin, first, open your file in the app.
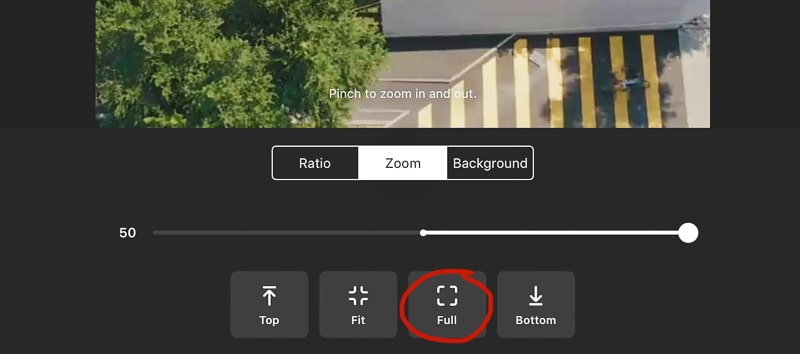
On the far left, in the “Canvas” section, you can adjust the aspect ratio of your video. Different video dimensions are best suited for each social platform. You can pick the frame size of Instagram, YouTube, or TikTok videos. If you want to leave the aspect ratio the same, choose “No Frame.”
If you do choose a different aspect ratio, a blurred background will appear in the blank space. To remove these borders, go to “Zoom” and tap “Full.”
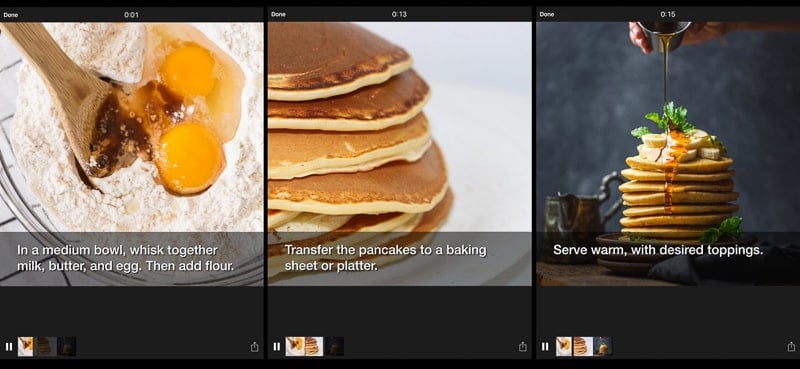
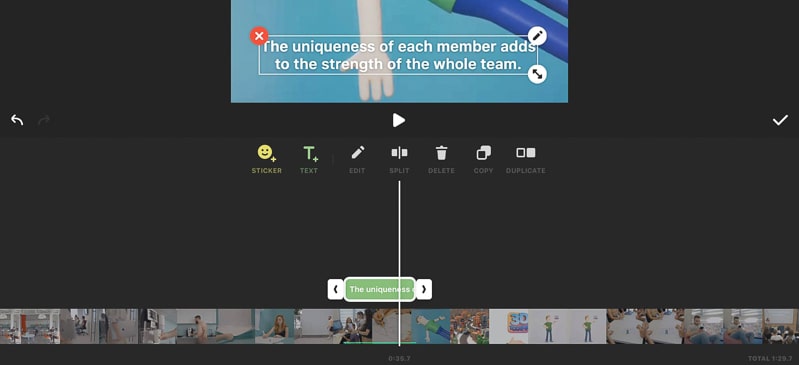
To start adding captions, play the video and find the exact point where the voice-over or dialogue starts. Pause right there, tap on “Text,” and type a small portion of the speech.
Once finished, pinch the text box to reduce its size and fit within your frame. If the line is still too long, break it into two by clicking enter, and move half of the text into a second line. Then, place your caption near the bottom and align it in the center.

To match your caption with the voice-over, play the video once again. Use the arrows to adjust the time span when the caption appears on the screen. Once the two are aligned, start your next caption. Make sure that your captions are not overlapping, otherwise, they will appear on top of each other when the video is played.
You can make your captions longer and more sparse, or you can choose shorter captions for a more dynamic feel. Of course, in the second case, the process might take a bit longer, as there will be more captions to align.
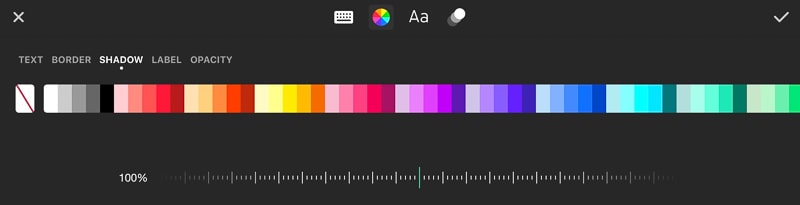
InShot allows you to customize the way captions are displayed as well. In the editing mode, there are four sections. The first is for editing the transcript itself. The second (with a color wheel as an icon) enables you to change color and opacity, add more shadow to separate the text from the background, and even add borders to your caption if you wish.
In the third section, you can choose a custom font for your captions or upload a new font, if it’s not available. The last section, with overlapping circles for an icon, allows you to put your text to motion.
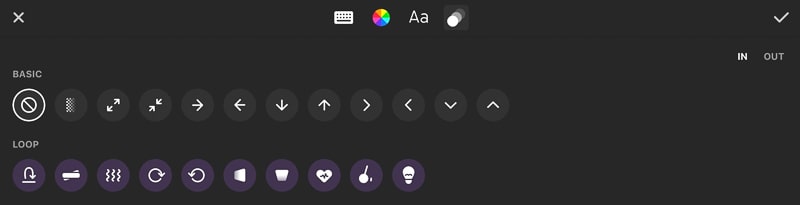
As fun as it is, this feature is not very relevant for captions but would come in handy when creating video titles, for example. When it comes to captions, readability matters above all else. Thus, even though the app provides lots of ways to make your captions fancier, the default option is the most preferable.
When you’ve finished adding your captions and are satisfied with the result, save the video by tapping the export button in the top-right corner. Don’t delete the original video file until you’re sure that there are no more edits to make within the app.
That’s it. Your captioned video is ready to shine on social media!
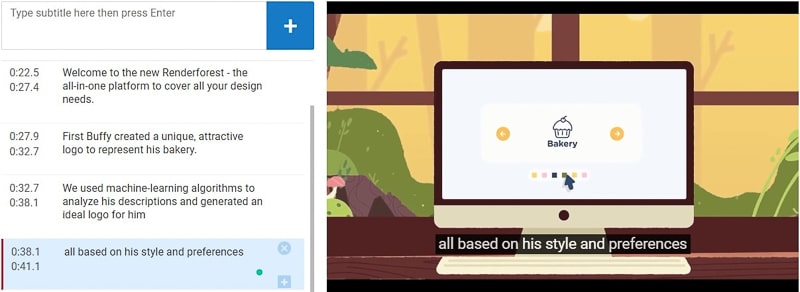
Online video makers, like Renderforest, are another convenient way to add open captions to your videos. Such tools provide customizable templates that you can use to create videos quickly and easily.
Some of the templates are perfectly suited for editing videos or adding captions to them. As an example, you can check out this Broadcast Video Editing Toolkit by Renderforest.
To caption your video with this template, click the “Create Now” button above, and then the selfsame button on the page you’re directed to. Once in the editor, click “Add scene” and look through the available items using the left-hand panel.
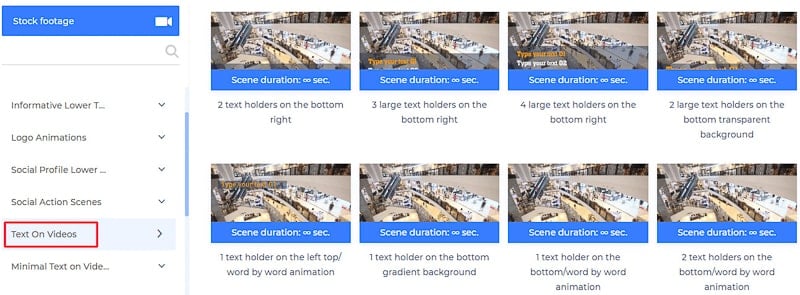
First, choose opening titles for your video, then find suitable text holders for the captions. The section “Text on Videos” is best suited for this purpose. Here, you will find text holders of different styles and placements. Take your time to explore all the options.
To add one or several scenes to your video project, select them and click “Insert scene.” Once you do so, you’ll be taken to the editor.

The text field on the left is where you should type the opening titles and captions. To add a video to the project, click on the video holder on the right and select one of the options. You can upload your own footage, or search for suitable stock videos right in the editor.
As you select video footage, be sure to trim it and leave only the part that matches the relevant caption. Use the arrows of the trimmer to choose the part you want for the specific scene and click “Trim.”
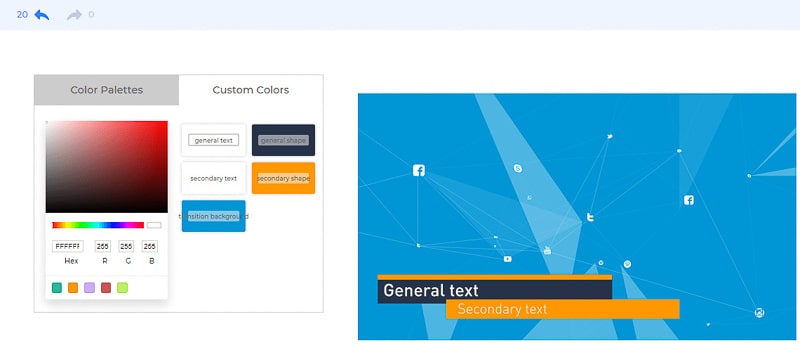
Once you complete all the scenes, proceed to the “Style” section from the top panel. Here, you can choose one of the available scene transitions. If you’d like to change the color of the text or its background, go to the “Color” section. Pick any of the palettes or create a custom one yourself.
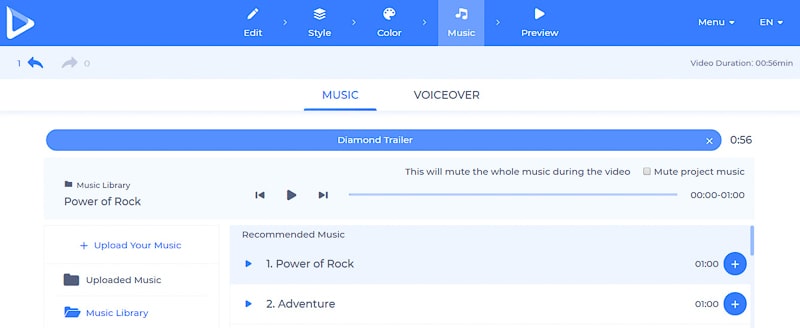
In the next “Music” section you can select a soundtrack for your video online or upload one. If you don’t want your video to have any sound, check the box “Mute project music.” Here, you can also record a voice-over or upload an existing one to the editor.
To preview your project, move on to the next section and click “Free Preview.” Wait till your video renders in low resolution and see if you’re satisfied with the result. If you’d like to add edits after previewing your video, feel free to go back to the editor and do so.
If you’re satisfied with the result, you can download it in low quality or choose the paid option for high resolution.
Before you get down to captioning your videos, first consider if what you are looking for are captions or subtitles. The two are different from each other, even though the process of creating them is roughly the same. Whereas subtitles only include the spoken dialogue or the video voice-over, captions include other elements of the audio as well.
In the latter, you will often see various sounds described in square brackets, like [whispers], [barking sounds], [soft music starts playing], etc. In short, captions are designed for an audience with hearing disabilities, while subtitles assume that the viewers can hear the audio.
Also, closed captions usually mention who is talking, especially when there’s an off-screen dialogue. The reason is simple. People who can hear the audio will have no trouble identifying the voices. But those who cannot hear it, won’t be able to tell who exactly is talking offscreen.

If by now you’re wondering whether captions are worth all that trouble, we’re here to tell you they are! Video captions are useful in several ways. Let’s cover the main reasons why you should use them.
First, captions make video content more accessible to people with hearing disabilities. For this reason, closed captions are required on television and many online video channels by US federal law.
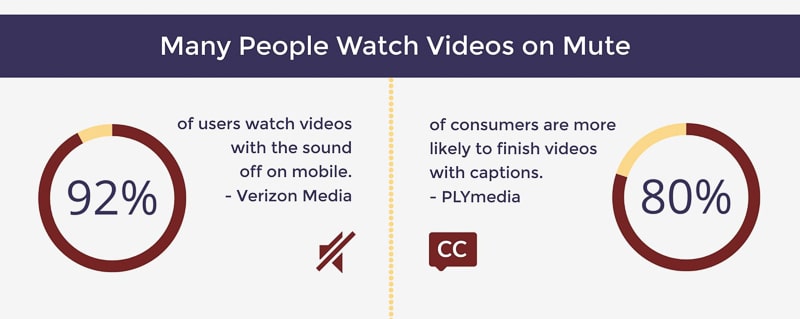
Secondly, there’s a large number of people, who prefer watching videos with the sound off. This is especially the case while watching them in sound-sensitive environments. Captions help us understand the contents of a video while still having it on mute.
The bottom line is — by not captioning your videos you lose a huge chunk of your audience.
Transcribed videos are better discoverable and rank higher on search engines. The reason is that video files are not crawlable by search engine bots. By adding transcripts and captioning your videos you make them accessible for crawling and indexing.
This, in turn, boosts the discoverability of your videos, as they now have more chances of appearing in relevant search results. But do note that to have SEO benefits, you need to upload and use caption files, and not “burn” the captions into the video itself. For more info on how to improve your video rankings, watch this video.
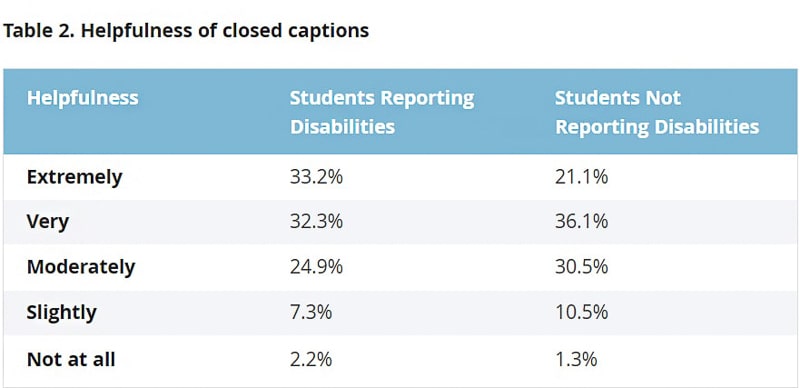
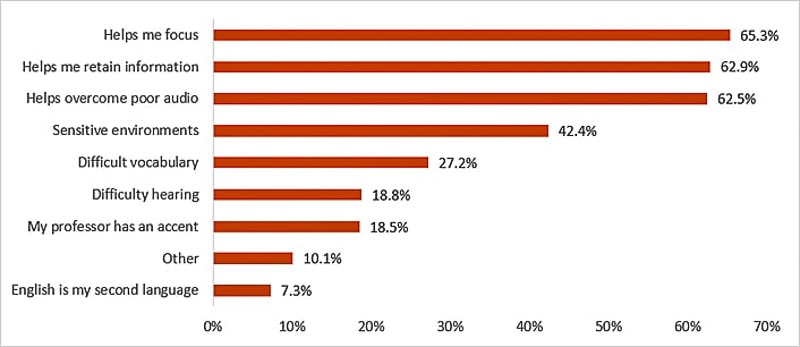
Among other things, captions help people better assimilate and memorize the contents of a video. By following the displayed captions along with the speech, people retain more of the information. According to a 2015 research study, students with and without hearing disabilities find captions almost equally useful for understanding the material.
Thus, captioning is especially important for educational video channels. If you are creating informative videos and want your audience to take away as much as possible from them, captioning is a must.
Here are some other caption benefits mentioned by the participants of the study.
Conclusion
To sum up, if you’re taking your video marketing efforts seriously, adding subtitles or captions to your videos is a must. Once you’ve put so much money and effort into creating your video content, it’s worth taking this one more step and adding subtitles to the video you’ve made. This will make sure your video is found, watched, and appreciated by as many people as possible.
Hopefully, our article helped you to simplify this process and get your captioned videos out there quicker and easier. If you’re also looking for a faster way to create videos, check out our huge templates library. Keep in mind that besides Facebook, Instagram, and YouTube, you can also add captions to TikTok content that you can create using a TikTok video template.
With Renderforest, you can create professional promo videos and commercials, educational videos, logo animations, and more — all with ready-made templates and presets. Click the button below to give it a try!
Share this
Article by
Dive into our Forestblog of exclusive interviews, handy tutorials and interesting articles published every week!
Read all posts by Renderforest StaffCreate Professional
in Minutes without Technical Skills.


Create Professional
in Minutes without Technical Skills.
Sign Up Now. It’s Free!